Compatible Layers
Any vector layer with spatial point objects that the user has editing rights to can be edited. The layer must be made active before it can be edited. For the purpose of the help documentation, it is assumed that editing takes place in the Sandbox (Points) layer.
Creating a New Object
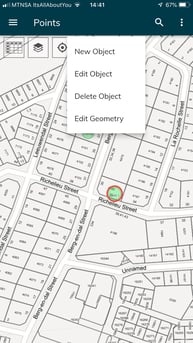
- Select the Edit Spatial Feature icon by tapping it once with a single finger.
- Select the New Object option from the menu that pops up.
- An orange crosshair appears in the center of the screen. Pan the screen until the crosshair is directly over the position of the point you wish to capture and tap the crosshair once with a single finger.
- Enter the values for the attributes available on your edit template.
- Tap the Save button to save your new object.
- You will see your newly created point object as a green circle on your map.
Editing Objects and Attributes
- Select the object you wish to edit by tapping on it.
- Select the Edit Spatial Feature icon by tapping it.
- Select Edit Object from the menu by tapping on it.
- Tap the pencil icon, edit the attributes, and tap the “Save” button.
- Tap the attachment icon if you would like to view or add attachments to the currently selected object.
Adding Attachments
- While on the map screen, Select the object you wish to edit by tapping on it.
- Select the Attachment icon by tapping on it.

Attaching an Image
- To take a photo immediately, select the Take Photo icon by tapping it.
- Focus the camera on the object you want to photograph, and take the photo, and select Save or "Use Photo" (per your phone's OS).
- Add a caption and description for your image.
- Note that your location accuracy will be indicated. This is the accuracy of the GPS at the moment that the image is captured, in order to ensure that field workers capturing images are physically at the location where they should be capturing the image (i.e. meter reading or property valuations). If the GPS is deactivated or too inaccurate, a warning will pop up. Tap Yes to continue.
- You should see an icon appear with your newly created attachment.
- To select a photo already in your cellphone gallery, select the Files icon.
- Navigate to the photo you want to attach and select it.
- Add a caption and description for your image and tap Done then tap the Tick icon.
Deleting Attachments
- In edit mode, tap the object then tap the Attributes option.
- Swipe left (IOS) on the attachment you want to delete.
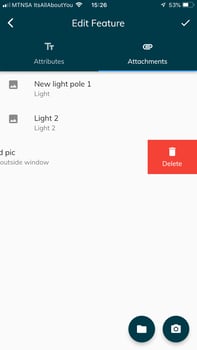
- Tap the Delete option that appears and confirm by tapping Delete to the question that pops up.
Moving Objects
- While on the Map screen, select the object you would like to move by tapping on it.
- Tap the Pencil icon and select the Move Object option that appears.
- An orange crosshair appears in on the object. Pan the screen until the crosshair is directly over the position of the point you wish to move the object to and tap the crosshair to confirm the move.
Deleting Objects
- While on the Map screen, select the object you would like to delete by tapping on it.
- Tap the Pencil icon and select the Delete Object option that appears.
- Confirm by tapping Yes.