What are Layers?
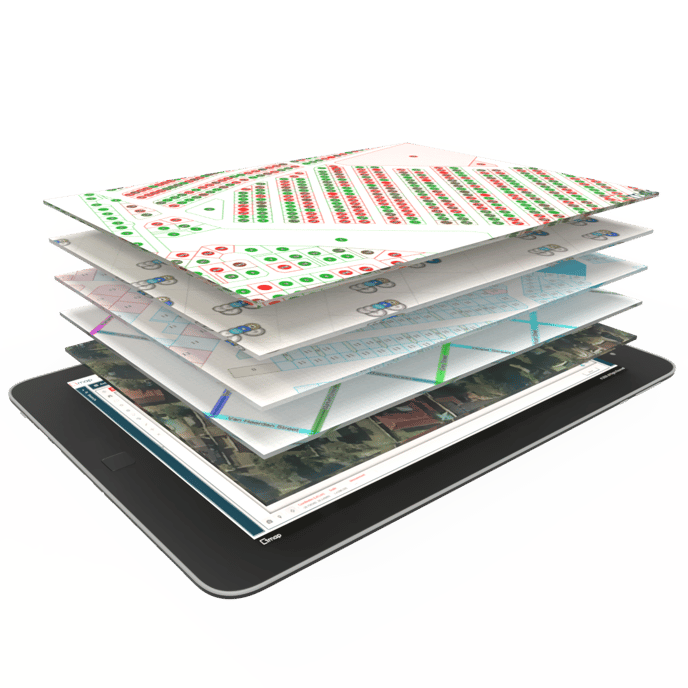
The map you see on 1map is made up of one or more spatial layers all overlaid on top of each other. Each layer represents and communicates data in an easy to understand way.
To illustrate the concept of layers, think of each layer as a transparent page that can be placed on top of each other, each with its own points, lines or polygons. The final image that you see projected would be made up of all the different transparencies combined. It’s as simple and easy as that! Each layer is like one of these transparent pages, all working together to form the final map you see on your screen.
The reason for doing this is simple: by grouping similar spatial objects (e.g. road centrelines, erven cadastre, or suburb boundaries) each into its own spatial layer, the user can create a customised map with only the data relevant to their specific application. This enables users to add an extraordinary amount of data to their map, without crowding it to such an extent that it loses its usefulness.
A demonstration video showcasing the concept of layers and providing step-by-step instructions on how to add layers.
There are two main formats for layers: Raster layers, and Vector layers, each with a particular use.
Raster
A raster layer is basically an image, such as an aerial photograph. The map that is displayed is an image that is composed of millions of different coloured pixels. Lines or objects on the map are only a collection of similarly coloured pixels on your image, and you cannot select or edit the objects. It is almost like when you scan in a page: The words are all there on the scanned image, but it is impossible to select or edit the scanned in text.
Raster layers are used typically as base layers compiled of various vector layers that have been converted to a single raster image. This is because they are fast to load and transfer, and form a perfect foundation on which to manage other spatial data (such as your vector files – more on that below). Aerial imagery would also typically be in raster format.
Vector
If a Raster layer is like a scanned image of a page, then Vector is like the original Word file. In other words, the spatial objects can be selected and edited.
Another way to think of vector layers is as transparent sheets placed on top of an aerial photograph (in this example, the aerial photograph would be a raster layer, and the transparent sheets will be vector):
Imagine you had an aerial photograph printed out. Now you put a single transparent sheet on top of that photograph, and draw lines with a marker where all the roads are. Next, place another transparent sheet on top of the first one, and once again take a marker but this time trace the property boundaries of all the erven on the photo. So you can continue with as many transparent layers as you want, each time adding a new type of spatial object, consisting of lines, points or shapes.
In 1map, the same principle applies: On each layer, spatial objects can be viewed, added, edited, moved or deleted. These objects are particular to the specific layer to which they belong (similarly, the lines drawn on any one transparent sheet will only appear on that same sheet, not on any of the other sheets).
It is important to note that each spatial object in the vector layer represents a record or row in the database. By selecting the objects in the vector, the user therefore selects the underlying data record, and can use the data for spatial queries and analysis.
Working with Layers
Visible & Active Layers
When working with layers, we can set 3 different layer states: Invisible, Visible, and Active. The first two are pretty straight forward: Invisible layers cannot be seen, and visible layers can be seen. Therefore, to ensure that a map that you are using meets your requirements but isn’t over-complicated, you would switch all the unnecessary layers that aren’t relevant to the task at hand to “Invisible”. They aren’t deleted, and can be switched to visible again for another task, but will not be seen on the map you are working on – only the “Visible” layers will be seen. The opacity of visible layers can also be adjusted.
The third state, “Active”, requires more explaining. Although all active layers are visible, not all visible layers are active. When a layer’s state is set to Active, the objects in the layer become selectable and editable. This is useful to differentiate between objects that you only want to be displayed on the map as reference points, and objects that you would want to interrogate or edit.
Order in which layers appear
When working with layers, the order in which they appear is crucial to ensure optimal usefulness. For example, if an opaque raster layer is selected, i.e. one that is not transparent, no layers appearing below the layer would be visible to the user, since the raster layer would obscure all layers below it.
Different layer orders also make certain spatial analyses possible, for example placing an aerial imagery layer at the bottom of your “layer stack”, with a property boundary layer on top of that to see whether there are buildings on the land parcels. If the property boundary layer was below the aerial imagery layer, it would have been impossible to see the property boundaries to determine which property was which.
This covers the basic concept of Layers, which is foundational to managing what you see in your maps at any time!
Once you have understood what layers are, check out this link to Workspaces which allows you to create a group of just the layers you need displayed for a particular workflow which you want to use regularly.
![logo-whte-1.png]](https://help.1map.co.za/hs-fs/hubfs/logo-whte-1.png?height=50&name=logo-whte-1.png)